
On this page
Summary
In this post I describe my experiences of translating a face-to-face course I run to an online course.
I have been running courses to teach people to support children using key word signs for a number of years (Signalong). These signs are used with normal spoken English to support people who have communication or learning difficulties. The course typically has around 12 participants. There is a mix of teaching to the whole class as well as lots of participation and activities which can also take place in small groups.
The idea of taking the course online was a little daunting at first because the face-to-face course is so interactive. However, with a bit of thought, I found that I could translate every activity I would usually do in the face-to-face version to the online version.
Here I tell you how I did it – starting with the software I used.
Choosing a platform
For this course, I used the Zoom platform. There are other platforms which may perform equally well. I use the terminology relating to Zoom in this post – if you are planning to use a different platform there should be equivalent features and controls in that.
The features that I needed a platform to have (and Zoom has) are:
- A mode where one person (for example the trainer) is taking up most of the screen no matter who is talking – in my case for when I was presenting new signs.
- A mode where you can have all of the participants on the screen at the same time (called “Gallery mode” in Zoom) – so you can see what everyone is doing (signing in my case), and don’t risk forgetting that someone is there.
- The ability to highlight individual students so that they take up the main part of the screen.
- A way of splitting students into small groups and for you as the trainer to move from one group to another to see what students are doing. Zoom calls these “breakout rooms”.
- A message window (chat) for sending messages to the whole class or to individual students – this is good for putting links to resources required for the class, uploading a resource for students to use, putting in information from a document which a student cannot open.
- Security features appropriate for your situation (discussion below).
Document sharing
For handouts and documents, you can upload these via the chat, however I find it more convenient to use a service like Dropbox. You can give people a link to a folder in your Dropbox (or OneDrive, or Google Drive or whatever) – so they can download documents from there. Make sure it is a “read only” or “view only” link so that people can’t edit your originals! It is then very simple to add documents in there as you go along, and people can also download the handouts after the class. You can usually set these links to “expire” – so you could have it expiring shortly after a course finishes.
I have a main folder where students will find the documents for the current class, and a sub-folder called “previous classes” where students can find the documents from previous classes.
Preparing the course
I strongly recommend trying everything out thoroughly before running a session. Try it out with friends or colleagues, or you can experiment by setting up a meeting between whatever devices you have and check out what it looks like from the point of view of the student and the trainer. In Zoom, you can switch who is in control of the meeting (the host) – so if you say have a phone and a laptop, you can experiment switching the host between each one so that you can see what it will look like for the respective roles on each device.
What device should I use?
I needed to see clearly what students were doing (their signs) – so if you need to see all your participants clearly you need to use something with a decent sized screen. In my case I needed to see people signing properly – that is from the waist to the top of the head: for a typical laptop, this means sitting around two metres or so away from the screen. I plugged a large monitor into my laptop when I ran the course so that I could get a really good picture of each person. I find with my set up with up to 12 people on a screen I get a good view of what people are doing (signs) and can correct them in the way I usually would. In fact one benefit is that as you don’t need to scan around as much as you would with a face-to-face course you can pick up more on what people are doing. If you don’t think you are going to get a good enough view of everyone in a class you might want to reduce the number of students.
As a trainer, I wouldn’t recommend using a phone or a tablet (unless it’s a very large tablet) as you won’t be able to see your students properly.
What device should your students use?
A laptop is definitely preferable, if not, a tablet should work reasonably well. Even phones with good screens can work – as long as they can get a good view of you. They are not ideal if you want your students to have a clear view of what you are doing.
Further comments about viewing students
You may need to ask students to move themselves or their device so that you get a better view of them – but mostly I didn’t need to remind students to do this.
In general lighting wasn’t an issue, however you should make sure you are lit clearly enough – and properly in view – so check your image in the gallery as well as the students.
If you are running an interactive course like mine, and for a good screen – that is a large screen or screen with good resolution, I would suggest having up to 11 students in your class at one time (you will have 4 x 3 people on your screen). If you don’t have a large screen, I would suggest limiting it to 8 students (you will have 3 x 3 people on your screen including the tutor). I was typically getting 9 students on my course and that was fine – I also have a large screen which I plugged into my laptop. This of course depends on the type of course you are running and how much you need to be able to see your students properly – so you might be able to accommodate many more students in your class.
Instructions for joining the course
These are instructions I gave to students coming along to my course. You may of course want to vary it for yours. Some instructions are specific to Zoom, so modify to whatever platform you are using. I have added some comments in italics.
It would be good if everyone could have a go at using Zoom before the course starts – so we can get going as quickly as we can.
Use this link to join the class – it will be the same link each week:
https://example.com/link-to-your-meeting
Please do not share this link with anyone else.
You *could* use a different meeting link each week, but that will almost certainly lead to confusion.
On a laptop, it should walk you through downloading and installing the Zoom app.
I highly recommend that you use a laptop, however, if you are on a phone (a tablet may be similar), it will probably ask you to open the URL with a browser (e.g. “Samsung Internet”). On the web page it takes you to, it will probably have a box at the top of the page for getting the app. If you are given a choice, Zoom meetings is the one you want. When you have got the app, it will probably ask you if you want to join a meeting – the meeting number to enter is 123456789.
Test out joining the class in advance as a student to see what happens and create these instructions.
Test it out!
You can click to join the class at any time to see if it works. You can try it out with someone else who is also on the course so you can get a feel of what it’s like. If you want to test it out with me, message me and I will join at the same time.
I gave the students the opportunity to try it out with me before the course. No-one needed to take me up on the offer however, and they all managed to join the course for real.
If everyone is using the Wi-Fi at the same time at your place
If there are a lot of people on the Wi-Fi at the same time where you are then the video may slow down. If you can, plug your device directly into the internet.
Particularly during the lock-down, there is a lot of demand on Wi-Fi – especially in more densely populated areas. Lots of neighbours also on their Wi-Fi will also limit bandwidth. I recommend to all students to plug their device directly into the internet. For a laptop, this will require a LAN cable to connect to the router and LAN to USB adapter to plug into the laptop (if there is no LAN connector on the laptop). These are widely available.
Position your device
This might not be applicable to your course.
I need to be able to see all of your signs – so make sure your device is just far enough away so that I can see all of your sign. (You will need both hands too).
Any problems
If something goes wrong, you can ring/text me on 01234 567890 (during the class as well).
It’s always a good idea to give students another way of contacting you if things go wrong.
Ensuring your students can get to the course
This discussion applies to Zoom, but it will probably be similar for other platforms.
You can set up a link for your class, email it around to your students, and they click on the link to join. The process is simple and it will step you through setting up any software – which takes no longer than a minute or two.
Security
There are different levels of security that you can apply – you should apply the appropriate level of security for your situation. Remember that the more security you apply, the more difficult it may be for some people to join – particularly for those who find IT challenging.
At its simplest, the link you send round enables anyone with the link to join the course. If you are inviting specific people and you are only giving them the link, that should generally be fine. I have not needed to go past this level, but Zoom does have a lot more options:
- You can add a separate passcode for the meeting – so they have to type that in when joining. For those who cannot manage that, you could send them a different link which has the passcode encrypted into it.
- You can require that users register before the meeting. This is highly recommended.
- You can “enable a waiting room”, meaning that when people come through to the meeting they are only let in if you click to let them in. For this feature to be really effective, you need to know who will be coming to your course, and let participants know that they should use the same display name for the meeting as the one they used when signing up.
- Another feature is to “lock the meeting” – so that no-one else can join the meeting from that point on.
Note: on Zoom from 19th July 2020 it is mandatory to set a passcode or enable a meeting room when setting up meetings.
You should never share a meeting link to your course publicly.
Internet connection
As mentioned in the comments in the joining instructions above, and especially during the lockdown period, if people can connect to the internet directly that will reduce the likelihood of a slow connection due to the Wi-Fi being overloaded.
So far in the course the connection has been good for most people most of the time. You should of course make sure you have a good connection – and you can’t really run the course if you don’t. On the other hand, you can’t be held responsible for someone else’s poor connection – apart from giving them the suggestions mentioned above – and making that clear in any pre-course information. That having been said, it’s probably a good idea to be prepared to offer an extra session to cover for any significant lost time due to connection problems.
Suggestions for translating various types of training activities
Presenting new information to the whole class
What usually happens
- Students focus on the trainer.
- Trainer demonstrates something to the students.
- Students have a go at whatever is demonstrated, tutor observes the class.
How to do it online
- The tutor “spotlights” themself – this means the focus always stays on them for the students – even when students are speaking. (Without being spotlighted, the focus jumps to whoever is speaking).
- Students should use the “presenter” view in Zoom – this is where one person fills most of the screen.
- Tutor views students in gallery mode – ideally on a larger screen – so they can see clearly what everyone is doing.
Group work – students presenting different information to each other
What usually happens
An activity in small groups, where students present something from information only they have.
In the Signalong course, there is an activity where students in small groups take it in turns to take a card with a sentence printed on it. They then sign what’s on the card without speaking and the other students in the group try and work out what was signed.
How to do it online
Prepare the information you need to give to individual students in advance. Have the documents available in a shared online folder (see above). I find using such a folder is convenient – and reduces the amount of faff for the trainer in the session. You can also share documents via the chat (takes a bit longer). Probably best to use PDF documents – people can generally open these even if they don’t have any Office software. I wanted each student in each group to have a different document (set of sentences for them to sign in this case), so I had documents labelled set1, set2, set3 …
You could share the pieces of information with individual students by pasting them into the chat – but reserve this only for the students who can’t open the documents for some reason – it takes too long to do this for every student, and it is easy to get confused about who has been given what.
In the class put students in groups using Zoom breakout rooms. You can have Zoom do this automatically – you choose how many groups you want. You can also assign people to groups manually. You can also move people from one group to another at any time.
Give students instructions to do the activity. Tell them that they should assign each person in their group to use a different set – set1, set2 and so on. I gave the students the link to the shared folder so they could get whatever set they needed from that.
After giving all the instructions and answering any questions, “open” the breakout rooms. Students are then invited to go into the “rooms”. Once in a room they only see the other students in that room, they can also only use the chat to communicate with individuals in that room – or they can send a message to everyone – so they can get the tutor’s attention in that way if they need it – but it’s not possible to send a chat message privately to an individual in a different room.
Quickly join each room in succession to make sure all the students have managed to access the documents they need. If a student can’t get the document they need, ask them which set they needed, and then copy and paste it from that set into their personal chat. Note you can only do this for text – not images.
You can then go from room to room to observe what the students are doing and give any assistance they might need just like you might do in a face-to-face class.
Paired activity in the whole class
What usually happens
In the Signalong class there is an activity where students are arranged in two lines facing each other, the tutor shows them a sentence on the screen, students sign across to their opposite number – with or without speaking.
How to do this type of activity online
- Make sure students are in gallery mode.
- Pair students up: do this by calling out names in the gallery.
- Students are instructed that they must focus on the other person in their pair.
- Each person in the pair should make sure they can see the other person on their screen. Students can stay in gallery mode, or, they could go into “presenter” mode and choose to pin the person they are paired with – they will get that person taking up most of their screen.
- Ensure students have enabled and can see the chat box.
- Copy and paste any information you need to give to the students in the chat box (in my case, these were sentences for the students to sign).
- Give feedback as required.
Working on a shared document
You can do this for the whole class – and use the screen sharing option to share a document with everyone. Individuals in breakout rooms can also do this. You could for example have a document in the shared folder for people to download and use in their breakout room. Ensure that at least one student in each room is able to open and edit a copy of the document.
Small group of students presenting to the whole class
You may want your students to prepare something in small groups in the breakout rooms and then come back and present to the whole class. In my case these were short plays which they had to sign.
There are a couple of ways of doing this. You could use presenter mode and encourage the other students to use presenter mode – that way whoever is speaking will be displayed as the main person on the screen.
You might however want to see all the students from the group doing their presentation at the same time, but no-one else. To do this – and to get it showing like this for everyone (not just you):
- Everyone go to video settings and choose “Hide participants who have their video turned off” (or similar option). Without this setting, if someone’s video is turned off it is shown as a box with their name in it.
- When it comes to a group doing a presentation, everyone (including the tutor) but except those presenting should choose “stop video” for themselves. You will then be left with just those who are presenting on the screen.
- Everyone’s audio can still be heard (so people can applause!). After the presentation, everyone can turn their video back on again.
Physically demonstrating something – for example on a table
You might want to physically demonstrate something to your students – perhaps it involves moving items around on a table for example. But you still want people to be able to see you, and you still want to be able to view them on your screen. You can do this by setting up another device – for example, a phone – which has a view of whatever it is you want to show. I will describe how I set this up using a phone.
- Set up a phone as another Zoom “attendee” – and position it above a table so you have a view of the table. (Join the meeting from that phone by going to the meeting link).
- Set the phone so that it is showing a landscape rather than portrait image – that way you are maximising the size of the picture that will show in Zoom.
- This is how I set it up:
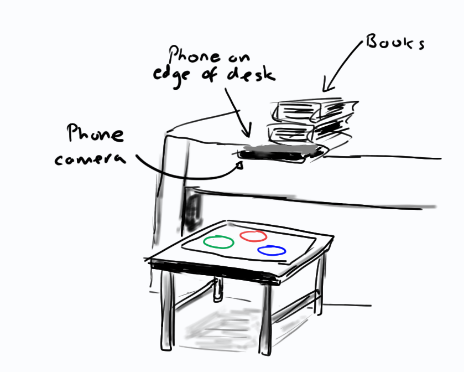
- The books are sitting on the edge of the phone to stop it falling off the desk.
- I have seen an arrangement where a phone is sandwiched between two tins of beans.
- Best to set up your phone before the session and leave it on – as it can be hard to get to the controls. Also probably best to have it plugged into the charger as if you get to this bit an hour into the session your phone may have run out of battery (constant video uses a lot!).
- Set the phone to join with video but without audio (otherwise you will get some weird feedback noise sounding a bit like a science fiction film): as a host you can always turn its audio off from your computer if you’ve already set the phone up and can’t get to the screen.
- As you may not be able to easily get to your phone controls when it is set up to turn off the video when you don’t need it, I put some black card on the table covering what was there when not in use. Don’t turn off the video from the host, because if you need to turn it on again you will have to get back to the phone’s screen to do that.
Activity where students need to take it in turns in a group
What usually happens
Go round a circle with students taking it in turns to say something, present something etc.
How to do it online
Make sure everyone can see each other on the screen (gallery mode in Zoom). Typically the order of participants you see on your screen may not be the same as the order on other people’s screens. The order can also change – for example if someone temporarily drops their connection.
This is what you can do.
Ensure you have allowed participants to change their names in the session. Give each person in turn a number, and ask them to rename themselves so the number appears before their name – for example “6. Harriet Smith”. You can then carry out the activity and people can take their turns (by following the number order) without you needing to call them out.
Questions and answers, discussions
Use the normal/default mode: that is no-one is spotlighted, and the focus jumps to whoever is speaking. For the tutor, gallery mode will usually be preferred to help check if anyone is being left out of the discussion.
Good luck with your course!
Help and support
If you would like some support in using these techniques for your training, please do get in touch using the contact form below. There is no charge for this, however if you find the support useful, please make a donation to Commtap.